5s quảng cáo
 Mình có 1 shopee nho nhỏ bán ốp iPhone kunn.oops, mọi người ủng hộ nhé :D
Giới thiệu
Trong bài trước tôi đã đề cập tới 2 trong số 3 Annotation cơ bản trong thiết kế Layer của Spring Boot.
Trong bài hôm này, chúng ta sẽ tìm hiểu thêm về cách Spring Boot tìm kiếm Bean trong project của bạn như thế nào.
Cài đặt
<?xml version="1.0" encoding="UTF-8"?>
<project xmlns="http://maven.apache.org/POM/4.0.0" xmlns:xsi="http://www.w3.org/2001/XMLSchema-instance"
         xsi:schemaLocation="http://maven.apache.org/POM/4.0.0 http://maven.apache.org/xsd/maven-4.0.0.xsd">
    <modelVersion>4.0.0</modelVersion>
    <packaging>pom</packaging>
    <parent>
        <groupId>org.springframework.boot</groupId>
        <artifactId>spring-boot-starter-parent</artifactId>
        <version>2.0.5.RELEASE</version>
        <relativePath /> <!-- lookup parent from repository -->
    </parent>
    <groupId>me.loda.spring</groupId>
    <artifactId>spring-boot-learning</artifactId>
    <version>0.0.1-SNAPSHOT</version>
    <name>spring-boot-learning</name>
    <description>Everything about Spring Boot</description>

    <properties>
        <java.version>1.8</java.version>
    </properties>

    <dependencies>

        <!--spring mvc, rest-->
        <dependency>
            <groupId>org.springframework.boot</groupId>
            <artifactId>spring-boot-starter-web</artifactId>
        </dependency>
    </dependencies>

    <build>
        <plugins>
        <plugin>
            <groupId>org.springframework.boot</groupId>
            <artifactId>spring-boot-maven-plugin</artifactId>
        </plugin>
        </plugins>
    </build>

</project>
Component Scan
Trong bài 1 tôi có đề cập một lần về việc Spring Boot khi chạy sẽ dò tìm toàn bộ các Class cùng cấp hoặc ở trong các package thấp hơn và tạo ra Bean từ các Class tìm thấy.
Bây giờ chúng ta sẽ nói sâu hơn một chút!
Thử ví dụ này nhé:
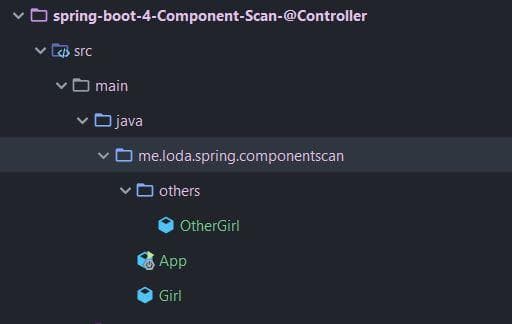
Chúng ta có một project có cấu trúc thư mục như này:

Tôi tạo ra 2 Bean:
Girl. Nằm cùng package vớiAppOtherGirl. Nằm ở package conothers.otherscùng cấp vớiApp
Girl.java
@Component
public class Girl {

    @Override
    public String toString() {
        return "Girl.java";
    }
}
OtherGirl.java
@Component
public class OtherGirl {
    @Override
    public String toString() {
        return "OtherGirl.java";
    }
}
App.java
@SpringBootApplication
public class App {
    public static void main(String[] args) {
        ApplicationContext context = SpringApplication.run(App.class, args);
        try {
            Girl girl = context.getBean(Girl.class);
            System.out.println("Bean: " + girl.toString());
        } catch (Exception e) {
            System.out.println("Bean Girl không tồn tại");
        }

        try {
            OtherGirl otherGirl = context.getBean(OtherGirl.class);
            if (otherGirl != null) {
                System.out.println("Bean: " + otherGirl.toString());
            }
        } catch (Exception e) {
            System.out.println("Bean Girl không tồn tại");
        }
    }
}
Chạy chương trình:
Bean: Girl.java
Bean: OtherGirl.java
Kết quả in ra màn hình là cả 2 bean Girl và OtherGirl đều được tạo ra trong Context.
Điều này chứng tỏ Spring Boot đã đi tìm các Bean bên cạnh class App và những package con bên cạnh App
Component Scan
Trong trường hợp bạn muốn tuỳ chỉnh cấu hình cho Spring Boot chỉ tìm kiếm các bean trong một package nhất định thì có các cách sau đây:
- Sử dụng
@ComponentScan - Sử dụng
scanBasePackagestromg@SpringBootApplication.
Cách 1: @ComponentScan
Sửa file App.java thành:
@ComponentScan("me.loda.spring.componentscan.others")
@SpringBootApplication
public class App {
    public static void main(String[] args) {
        ApplicationContext context = SpringApplication.run(App.class, args);
        try {
            Girl girl = context.getBean(Girl.class);
            System.out.println("Bean: " + girl.toString());
        } catch (Exception e) {
            System.out.println("Bean Girl không tồn tại");
        }

        try {
            OtherGirl otherGirl = context.getBean(OtherGirl.class);
            if (otherGirl != null) {
                System.out.println("Bean: " + otherGirl.toString());
            }
        } catch (Exception e) {
            System.out.println("Bean Girl không tồn tại");
        }
    }
}
Cách 2: scanBasePackages
@SpringBootApplication(scanBasePackages = "me.loda.spring.componentscan.others")
public class App {
    public static void main(String[] args) {
        ApplicationContext context = SpringApplication.run(App.class, args);
        try {
            Girl girl = context.getBean(Girl.class);
            System.out.println("Bean: " + girl.toString());
        } catch (Exception e) {
            System.out.println("Bean Girl không tồn tại");
        }

        try {
            OtherGirl otherGirl = context.getBean(OtherGirl.class);
            if (otherGirl != null) {
                System.out.println("Bean: " + otherGirl.toString());
            }
        } catch (Exception e) {
            System.out.println("Bean Girl không tồn tại");
        }
    }
}
Cả 2 cách đều cho kết quả in ra màn hình như sau:
Bean Girl không tồn tại
Bean: OtherGirl.java
Lúc này, Spring Boot chỉ tìm kiếm các bean trong package others mà thôi. Nên khi lấy ra Girl thì nó không tồn tại trong Context.
Multiple package scan
Bạn có thể cấu hình cho Spring Boot Tìm kiếm các Bean ở nhiều package khác nhau bằng cách:
@ComponentScan({"me.loda.spring.componentscan.others2","me.loda.spring.componentscan.others"})
hoặc
@SpringBootApplication(scanBasePackages = {"me.loda.spring.componentscan.others", "me.loda.spring.componentscan.others2"})
Kết
Đây là một bài viết trong Series làm chủ Spring Boot, từ zero to hero
Như mọi khi, code được up tại Github
 DaoThaiSon.me
