5s quảng cáo
 Mình có 1 shopee nho nhỏ bán ốp iPhone kunn.oops, mọi người ủng hộ nhé :D
Giới thiệu
Tiếp nối series Spring Boot:
Spring Profiles là một core feature trong Spring Framework, cho phép chúng ta cấu hình ứng dụng, active/deactive Bean tùy theo môi trường.
Một kịch bản thực tế:
Mình có 1 ứng dụng
Spring Bootdùng để đọc báo, tuy nhiên mình phải hosting nó trênAWS. Vấn đề lúc này là khi đang viết code ở local thì mình cần kết nối vớiMySQLtại máy tính của mình, khi đưa lên AWS thì cần kết nối tớiMySQLcủaAWS. Ngoài ra, chưa kể mình muốn cấu hình các biến cục bộ khác cho phù hợp với môi trường nhưlog,redis,secret, v.v.. đặc biệt là việc một số phần trong code có thể thay đổi theo môi trường nữa.
constants:
  service:
    phase: ALPHA
    debug: true

spring:
  redis:
    clusterUri: redis://[email protected]:7000
  datasource:
    username: xxx
    password: none
    url: jdbc:mysql://10.127.233.12:2030/news?useSSL=false&characterEncoding=UTF-8

news:
  api:
    channel-id: 1510354028
    channel-secret: e17c94a02293b33a32629407b32b40a5
    official-account-mid:
    connection-timeout-secs: 20
    .
    .
    ..
rất rất nhiều config phải không :((((
Sớm nhận ra những khó khăn trong việc config khi xây dựng ứng dụng, nên Spring đã cho ra đời Spring Profiles để giải quyết các vấn đề này.
1. Tạo file config
Spring Profiles có sẵn trong Framework rồi nên bạn không cần thêm bất kì thư viện nào khác.
Để sử dụng, các bạn tạo file config tại thư mục resources trong project. Mặc định Spring sẽ nhận các file có tên như sau:
application.properties
application.yml
application-{profile-name}.yml // .properties
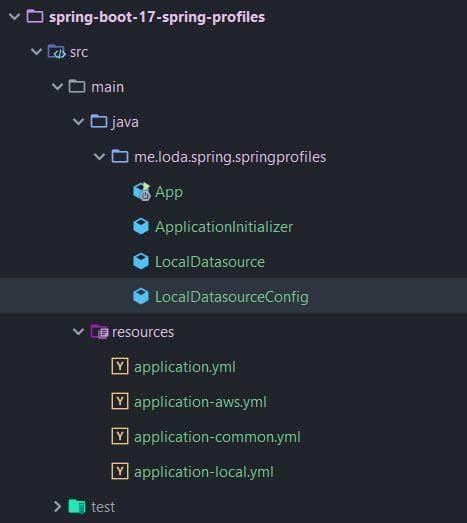
ví dụ mình có 2 môi trường là local và aws, thì mình sẽ tạo ra các file như thế này:
application.yml
application-local.yml
application-aws.yml
application-common.yml
applicationlà file config chính khai báo các enviroment.application-localchỉ sử dụng khi chạy chương trình ở localapplication-awschỉ sử dụng khi chạy ở AWSapplication-commonlà những config dùng chung, môi trường nào cũng cần.
Bây giờ, mình sẽ khai báo trong từng file như sau:
application.yml
#application.yml
---
spring.profiles: local
spring.profiles.include: common, local
---
spring.profiles: aws
spring.profiles.include: common, aws
---
application-aws.yml
spring:
  datasource:
    username: xxx
    password: xxx
    url: jdbc:mysql://10.127.24.12:2030/news?useSSL=false&characterEncoding=UTF-8
application-local.yml
spring:
  datasource:
    username: root
    password:
    url: jdbc:mysql://localhost:3306/news?useSSL=false&characterEncoding=UTF-8

logging:
  level:
    org:
      hibernate:
        SQL: debug
application-common.yml
spring:
  jpa:
    properties:
      hibernate:
        jdbc:
          batch_size: 50
          batch_versioned_data: true
    hibernate:
      ddl-auto: none
Tadaa, xong, mình giải thích chút. bạn để ý trong file application.yml mình có khai báo 2 môi trường là local và aws. Tại mỗi môi trường sẽ include (bao gồm) các file config như kia. Khi mình kích hoạt aws chẳng hạn, Spring sẽ load tất cả config có trong application-common.yml và application-aws.yml. Rất tiện phải không :3
2. Kích hoạt config
Để sử dụng một Profiles bạn có các cách sau:
#1: Sử dụng spring.profiles.active trong file application.properties hoặc application.yml
spring.profiles.active=aws
#2: Active trong code, trước khi chạy chương trình.
@Configuration
public class ApplicationInitializer
  implements WebApplicationInitializer {

    @Override
    public void onStartup(ServletContext servletContext) throws ServletException {
        servletContext.setInitParameter(
          "spring.profiles.active", "aws");
    }
}
hoặc
@Autowired
private ConfigurableEnvironment env;
...
env.setActiveProfiles("aws");
hoặc
SpringApplication application = new SpringApplication(SpringBootProfilesApplication.class);
ConfigurableEnvironment environment = new StandardEnvironment();
environment.setActiveProfiles("aws");
application.setEnvironment(environment);
application.run(args);
Mình không khuyến khích cả 3 cách này ==!
#3: Sử dụng JVM System Parameter (nên dùng)
-Dspring.profiles.active=aws
#4: Environment Variable (Unix) (nên dùng)
export SPRING_PROFILES_ACTIVE=aws
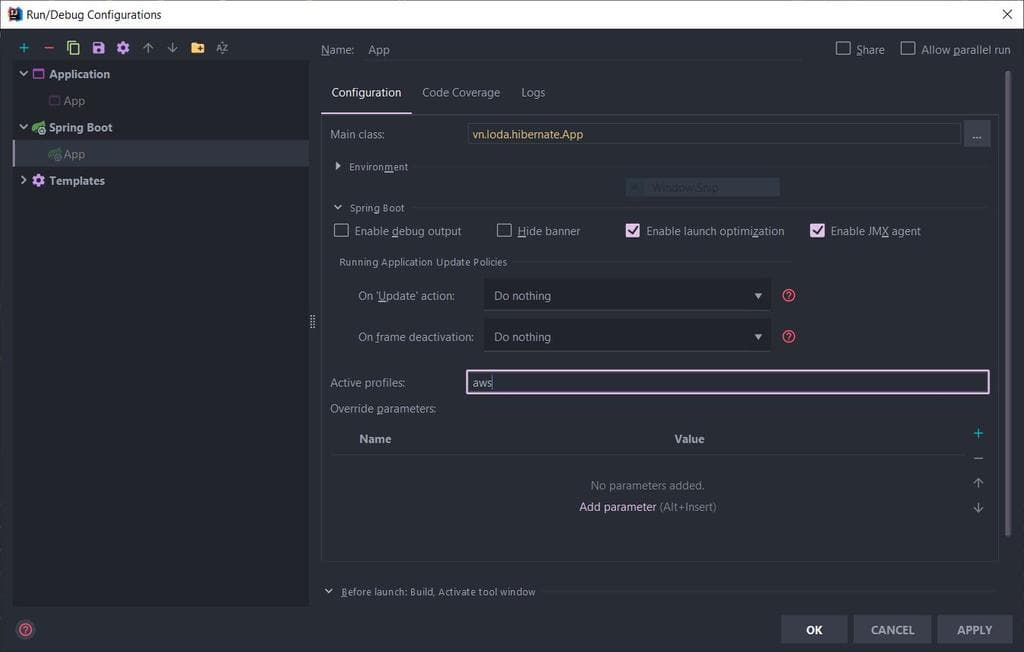
Nếu ai sử dụng Intellij IDEA thì có thể config ngay trong IDE như thế này, mỗi lần chạy nó tự active cho mình.
3. Cách sử dụng @Profile
Khi đã có Profile rồi, ngoài các biến toàn cục được thay đổi theo môi trường, bạn cũng có thể toàn quyền quyết định xem trong code rằng Bean hay Class nào sẽ được quyền chạy ở môi trường nào. Bằng cách sử dụng annotation @Profile
// Bean này Spring chỉ khởi tạo và quản lý khi môi trường là `local`
@Component
@Profile("local")
public class LocalDatasourceConfig
Ngoài ra bạn có thể sử dụng toàn tử logic ở đây, ví dụ:
// Bean này Spring chỉ khởi tạo và quản lý khi môi trường là những môi trường không phải là `local`
@Component
@Profile("!local")
public class LocalDatasourceConfig
Demo
Cài đặt:
pom.xml
<?xml version="1.0" encoding="UTF-8"?>
<project xmlns="http://maven.apache.org/POM/4.0.0" xmlns:xsi="http://www.w3.org/2001/XMLSchema-instance"
         xsi:schemaLocation="http://maven.apache.org/POM/4.0.0 http://maven.apache.org/xsd/maven-4.0.0.xsd">
  <modelVersion>4.0.0</modelVersion>
  <packaging>pom</packaging>

  <parent>
    <groupId>org.springframework.boot</groupId>
    <artifactId>spring-boot-starter-parent</artifactId>
    <version>2.1.4.RELEASE</version>
    <relativePath /> <!-- lookup parent from repository -->
  </parent>
  <groupId>me.loda.spring</groupId>
  <artifactId>spring-boot-learning</artifactId>
  <version>0.0.1-SNAPSHOT</version>
  <name>spring-boot-learning</name>
  <description>Everything about Spring Boot</description>

  <properties>
    <java.version>1.8</java.version>
  </properties>

  <dependencies>
    <dependency>
      <groupId>org.springframework.boot</groupId>
      <artifactId>spring-boot-starter-web</artifactId>
    </dependency>

    <dependency>
      <groupId>org.projectlombok</groupId>
      <artifactId>lombok</artifactId>
      <optional>true</optional>
    </dependency>
  </dependencies>

  <build>
    <plugins>
      <plugin>
        <groupId>org.springframework.boot</groupId>
        <artifactId>spring-boot-maven-plugin</artifactId>
      </plugin>
    </plugins>
  </build>

</project>
Cấu trúc thư mục:
Tạo Model
Chúng ta sẽ tạo ra một class là LocalDatasource, và kiểm tra xem, khi thay đổi profile thì nó sẽ được tạo ra hay không.
Trong bài viết có sử dụng Lombok
LocalDatasource.java
@Data
@AllArgsConstructor
public class LocalDatasource {
    private String url;
}
LocalDatasourceConfig
/**
 * Chỉ khi profiles là "local"
 * Thì Configuration dưới đây mới được khởi tạo
 */
@Configuration
@Profile("local")
public class LocalDatasourceConfig {

    @Bean
    public LocalDatasource localDatasource() {
        return new LocalDatasource("Local object, Chỉ khởi tạo khi 'local' profile active");
    }
}
Chạy thử
App.java
@SpringBootApplication
public class App {

    public static void main(String[] args) {
//        SpringApplication.run(App.class, args);

        SpringApplication application = new SpringApplication(App.class);
        ConfigurableEnvironment environment = new StandardEnvironment();
//        Thay đổi môi trường bằng cách comment và xem kết quả
//        environment.setActiveProfiles("local");
        environment.setActiveProfiles("aws");
        application.setEnvironment(environment);
        ApplicationContext context = application.run(args);

        LocalDatasource localDatasource = context.getBean(LocalDatasource.class);
        System.out.println(localDatasource);
    }
Khi mình để profile là aws thì chương trình sẽ trả về lỗi:
No qualifying bean of type 'me.loda.spring.springprofiles.LocalDatasource' available
Đại ý là bean LocalDatasource không hề tồn tại trong Context.
Còn khi kích hoạt profile local thì output chương trình sẽ là:
LocalDatasource(url=Local object, Chỉ khởi tạo khi 'local' profile active)
Kết
Okiee lahhh, thế là mình đã giới thiệu xong với các bạn Spring Profiles, Đây là một tính năng cực kì cực kì hữu ích, hi vọng các bạn hiểu và nắm được kiến thức, áp dụng vào sản phẩm của chính mình. Chúc các bạn thành công!
Đây là một bài viết trong Series làm chủ Spring Boot, từ zero to hero
Và như mọi khi, toàn bộ code đều được up lên Github.