5s quảng cáo
 Mình có 1 shopee nho nhỏ bán ốp iPhone kunn.oops, mọi người ủng hộ nhé :D
Giới thiệu
Spring Cloud Config là một mô-đun của Spring Cloud cung cấp việc lưu trữ và phục vụ các cấu hình phân tán trên nhiều ứng dụng và môi trường.
Trong các ứng dụng thực tế, các ứng dụng có các thông tin cầu hình chung và riêng. Chẳng hạn như các ứng dụng cần dùng chung thông tin về cơ sở dữ liệu để truy cập, ngoài ra mỗi ứng dụng cần chạy trên một cổng port riêng. Trong bài viết này, chúng tôi sẽ thiết lập một ứng dụng ConfigServer quản lý tất cả các tệp cấu hình được lưu trên folder và một ứng dụng ClientService tiêu thụ nhiều tệp cấu hình (multiple config file) này khi khởi động.
Spring Cloud Config Server
Đầu tiên chúng tôi xây dựng ứng dụng ConfigServer. Trong IDE, chúng tôi tạo một mô-đun Maven với các dependencies sau:
pom.xml
<?xml version="1.0" encoding="UTF-8"?>
<project xmlns="http://maven.apache.org/POM/4.0.0"
         xmlns:xsi="http://www.w3.org/2001/XMLSchema-instance"
         xsi:schemaLocation="http://maven.apache.org/POM/4.0.0 http://maven.apache.org/xsd/maven-4.0.0.xsd">
    <modelVersion>4.0.0</modelVersion>

    <groupId>spring.cloud.config</groupId>
    <artifactId>ConfigServer</artifactId>
    <version>1.0-SNAPSHOT</version>

    <dependencies>
        <dependency>
            <groupId>org.springframework.cloud</groupId>
            <artifactId>spring-cloud-config-server</artifactId>
            <version>2.1.2.RELEASE</version>
        </dependency>
        <dependency>
            <groupId>org.springframework.boot</groupId>
            <artifactId>spring-boot-starter-webflux</artifactId>
            <version>2.1.4.RELEASE</version>
        </dependency>
    </dependencies>

</project>
Cấu trúc thư mục code bao gồm:
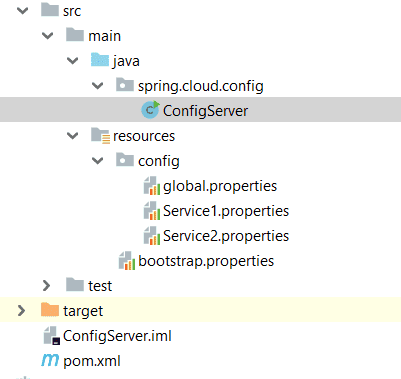
Tiếp theo, chúng tôi tạo folder config nằm trong package resource chứa các tệp cấu hình properties cho các ứng dụng. Để tạo các tệp properties, click chuột phải folder config chọn new -> Resouce Bundle -> <File Name>
global.properties
db.name=Test
db.username=atom
db.password=ptit
Service1.properties
server.port=8100
message1=File-Service1
Service2.properties
server.port=8200
message2=File-Service2
Để ứng dụng trỏ đến folder config vừa được tạo ở trên, trong tệp bootstrap.propertieschúng tôi thêm một số thông tin kèm chú thích ý nghĩa của từng thông tin cấu hình.
bootstrap.properties
#tên ứng dụng
spring.application.name=vConfigServer
#port ứng dụng
server.port=8000

# Chỉ định các tệp cấu hình sẽ được load từ local
spring.profiles.active=native

# url chứa các tệp cấu hình trên local
spring.cloud.config.server.native.searchLocations=classpath:/config
Cuối cùng, chúng tôi sử dụng @EnableConfigServer của Spring Cloud Config nhằm nói cho Spring Boot biết đây là Config Server
ConfigServer.Class
package spring.cloud.config;

import org.springframework.boot.SpringApplication;
import org.springframework.boot.autoconfigure.SpringBootApplication;
import org.springframework.cloud.config.server.EnableConfigServer;

@EnableConfigServer
@SpringBootApplication
public class ConfigServer {
    public static void main(String[] args) {
        SpringApplication.run(ConfigServer.class, args);
    }
}
Done! Bây giờ chúng ra run ứng dụng lên, ứng dụng này sẽ chạy trên cổng port 8000.
Để xem thông tin chi tiết về tệp cấu hình, truy cập theo đường dẫn:
http://localhost:8000/<file-name>/default
Đối với ứng dụng trên, chúng ta truy cập các url sau:
http://localhost:8000/global/default
http://localhost:8000/Service1/default
http://localhost:8000/Service2/default
Spring Cloud Config Client
Sau khi xây dựng xong ứng dụng ConfigServer. Bây giờ chúng tôi sẽ xây dựng ứng dụng ClientService để tiêu thụ các tệp cấu hình khi khởi động.
pom.xml
<?xml version="1.0" encoding="UTF-8"?>
<project xmlns="http://maven.apache.org/POM/4.0.0"
         xmlns:xsi="http://www.w3.org/2001/XMLSchema-instance"
         xsi:schemaLocation="http://maven.apache.org/POM/4.0.0 http://maven.apache.org/xsd/maven-4.0.0.xsd">
    <modelVersion>4.0.0</modelVersion>

    <groupId>daothaison.me</groupId>
    <artifactId>Service1</artifactId>
    <version>1.0-SNAPSHOT</version>

    <dependencies>
        <dependency>
            <groupId>org.springframework.cloud</groupId>
            <artifactId>spring-cloud-starter-config</artifactId>
            <version>2.1.0.RELEASE</version>
        </dependency>
        <dependency>
            <groupId>org.springframework.boot</groupId>
            <artifactId>spring-boot-starter-webflux</artifactId>
            <version>2.1.4.RELEASE</version>
        </dependency>
    </dependencies>

</project>
Cấu trúc thư mục code bao gồm:
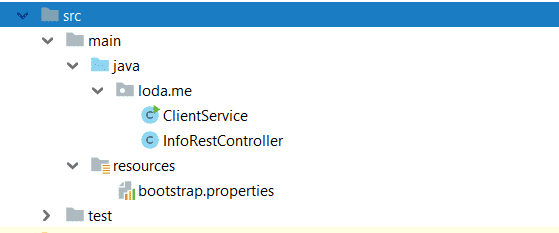
bootstrap.properties
#tên ứng dụng
spring.application.name=ClientService
#trỏ các tệp cần lấy cấ hình
spring.cloud.config.name=Service1,global
# tên profile
spring.cloud.config.profile=default

#Configuration server
spring.cloud.config.uri=http://localhost:8000/
ClientService.Class
package daothaison.me;

import org.springframework.boot.SpringApplication;
import org.springframework.boot.autoconfigure.SpringBootApplication;

@SpringBootApplication
public class ClientService {
    public static void main(String[] args) {
        SpringApplication.run(ClientService.class, args);
    }
}
Để lấy được các thông tin từ các tệp cầu hình, chúng tôi sử dụng @Value("${key:default-value}") . Với key tương ứng trên tệp cấu hình, còn default-value sẽ là giá trị mặc định nếu không lấy được thông tin với key tương ứng.
InfoRestController.Class
package daothaison.me;

import org.springframework.beans.factory.annotation.Value;
import org.springframework.web.bind.annotation.RequestMapping;
import org.springframework.web.bind.annotation.RestController;

import java.util.HashMap;
import java.util.Map;

@RestController
public class InfoRestController {
    @Value("${db.name:Data Null}")
    private String dbName;

    @Value("${db.username:Data Null}")
    private String dbUsername;

    @Value("${db.password:Data Null}")
    private String dbPassword;

    @Value("${message1:Data Null}")
    private String message1;

    @Value("${message2:Data Null}")
    private String message2;

    @RequestMapping("/info")
    Object getMessage() {
        Map<String, String>  data = new HashMap<String, String>();
        data.put("db.name", dbName);
        data.put("db.username", dbUsername);
        data.put("db.password", dbPassword);
        data.put("message1", message1);
        data.put("message2", message2);

        return data;
    }
}
Done! Bây giờ chúng ta chạy ứng dụng lên ( chú ý là chạy ứng dụng ConfigServer trước) và truy cập đường dẫn: http://localhost:8100/info
{
    "db.password": "ptit",
    "db.name": "Test",
    "db.username": "atom",
    "message2": "Data Null",
    "message1": "File-Service1"
}
Chúng ta nhận thấy rằng các thông tin từ 2 tệp Service1 và global đều lấy được, còn thông tin từ tệp Service2 thì không. Bởi vì chúng tôi chỉ cấu hình để lấy được từ 2 tệp kia trong bootstrap.properties.
Kết luận
Chúng tôi đã tạo ra một ứng dụng quản lý các tệp cấu hình cho toàn hệ thống, và ứng dụng khác tiêu thụ các tệp cấu hình đó một cách đơn giản nhất. Vậy là các bạn đã hiểu Spring Cloud Config cũng như các sử dụng nó rồi phải không nào ^^! Hẹn gặp các bạn ở các bài viết tiếp theo.